
 |
Quick Summary
If a cordless blind lifts unevenly (one side higher, drifting tilt, or “stair-step” motion), it is rarely “just the fabric.” In OEM terms, uneven lift is a torque + friction imbalance created by drive alignment, spring band mismatch, damping/brake inconsistency, or tolerance stack-up at the idler/bracket interfaces. This guide gives a factory-friendly workflow: symptom mapping → three measurements → root-cause table → corrective actions, so you fix the mechanism (not the customer’s patience).
Jump to:
1) Symptom Map: What “Uneven Lift” Looks Like
“Uneven lift” is a field complaint, but it’s also a diagnostic gift: the mechanism is telling you where energy is being lost. Common patterns:
- Left side higher than right (persistent bottom-rail tilt): usually alignment, asymmetric friction, or internal torque mismatch.
- Tilts only near the top: often damping/brake timing, tube/end plug interference, or spring release instability.
- Tilts only near the bottom: load band mismatch, incorrect pre-tension, or uneven bottom-rail mass distribution.
- “Clicks” + uneven rise: gear/brake chatter, burrs, or mis-seated bearings/end caps.
- One batch is bad, another is fine: tolerance drift (spring strip thickness, coil spacing, bracket hole position, idler concentricity).
And yes—your blind is not “trying a new yoga pose.” It’s just showing you where the drive system is fighting itself.
2) What’s Inside: The Hidden Drive System
 |
|
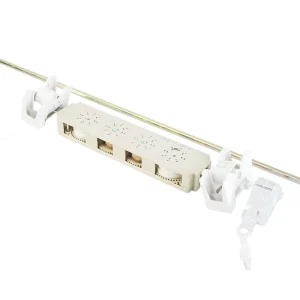
Cordless does not mean “no cords” in every architecture; it means no external hanging cords or chains. The lift force is generated and controlled inside the headrail/tube by a drive stack such as:
- Energy source: constant-force spring / spiral torsion spring / spring box module (stores energy when you pull down; releases to lift).
- Speed control: damper or brake (prevents slam-to-top and stabilizes rise rate).
- Transmission: shaft/drum/reel (converts spring torque into controlled lift motion).
- Support interfaces: idler, bearings, end plugs, brackets (where small misalignments become big friction).
- Load side: tube + fabric + bottom rail (mass distribution and squareness determine tracking).
Uneven lift is almost always caused by one of two realities: (A) misalignment (drive axis not truly coaxial/level), or (B) mismatch (spring force curve, damping, or load not in the same band).
3) The OEM Diagnosis Workflow (Fast + Measurable)
Step 0 — Lock the Symptom
Before disassembly, record:
- Tilt difference (mm) at bottom rail: left vs right height at the same reference point.
- When it happens: near top, mid-stroke, near bottom.
- Does it repeat after re-install? If not repeatable, you’re chasing installation geometry or intermittent friction.
Step 1 — Geometry Check (The Most Boring Step, Also the Most Profitable)
OEM reality: a small bracket error becomes a big torque imbalance. Check three basics:
- Level: headrail/tube level to the window frame (not the floor).
- Parallel brackets: bracket faces in the same plane; no twist preload.
- Square tube cut: tube ends must be perpendicular; angled cuts create tracking drift and uneven edge friction.
Step 2 — Load Band Check (Is the Spring Fighting Gravity Correctly?)
In spring-assisted cordless systems, target performance is typically achieved when spring output is slightly above the blind’s gravity, not wildly above it. If the spring is under-powered, the blind stalls; if over-powered, it “snaps” and exaggerates tilt through the stroke.
Total load ≈ (fabric mass + bottom rail mass) × g × safety factor (for friction).
If you have fabric density, compute fabric weight from width × drop × density.
Red flags: replacing fabric with a heavier blackout (or changing bottom rail profile) without re-matching the spring band, especially when the SKU is near the top end of the rated range.
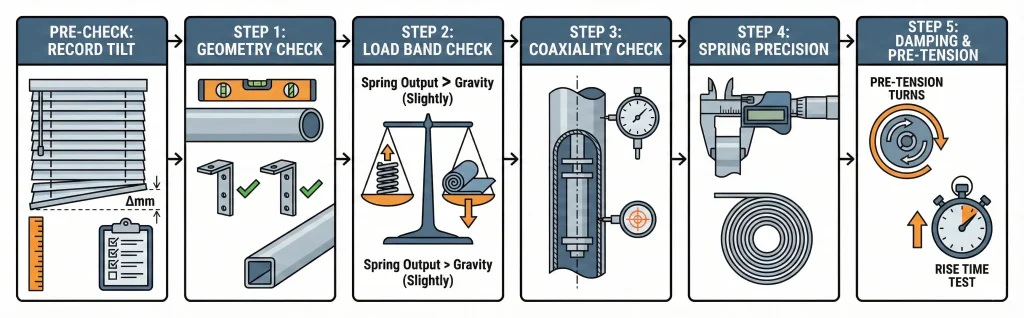
Step 3 — Coaxiality Check (The “Invisible” Cause of Tilt)
If the drive axis (spring + reel + tube) is not truly coaxial, the system runs eccentrically: one side sees more friction, the other side runs ahead, and the bottom rail tilts. For OEM diagnosis, do not guess—measure.
- Tool: dial indicator (recommended for repeatable QC).
- Method: measure runout/coaxiality at the reel/tube interface and at the opposite idler support.
- Interpretation: if coaxiality is out of spec, you will see force fluctuation, noise rise, and progressive wear.
Step 4 — Spring Strip + Coil Precision Check (Batch Issues Live Here)
If only certain lots show uneven lift, suspect tolerance drift in the spring and its forming precision. Focus on:
- Strip thickness and width consistency (small deviations can create large force curve differences).
- Coiling concentricity and spacing (eccentric operation increases friction and makes lift inconsistent).
- End finishing: burrs and edge defects can create asymmetric drag against housing or guides.
Step 5 — Damping/Brake + Pre-Tension Check (Smoothness = Stability)
If the blind tilts more near the top, or if it “surges,” your damping/brake tuning or pre-tension is likely off. OEM-friendly checks:
- Pre-tension: confirm standard turns are applied consistently (operator variance is a real “hidden variable”).
- Rise time test: time bottom-to-top rise; big variance is a brake/damper consistency problem.
- Noise check: rising noise spikes often indicate eccentric friction or inconsistent damping contact.
4) Root-Cause Table: Symptom → Cause → Fix
| Field Symptom | Fast Confirmation Test | Most Likely OEM Root Cause | Corrective Action |
| Permanent tilt (same side always higher) | Swap left/right brackets; if tilt flips, it’s geometry | Bracket misalignment; tube end not square; idler/bearing not seated | Re-level brackets; tighten tolerance on bracket hole position; enforce square-cut SOP; verify end plug seating torque |
| Tilt increases near top | Time rise speed; listen for surge/click | Damping/brake inconsistency; eccentric drag increases as spring unloads | Standardize damper friction stack; validate rise time window; inspect for housing rub marks; replace worn friction surfaces |
| Stalls mid-stroke + slight tilt | Measure pull-down force; check if the blind “holds” at mid-height | Spring force band too low; excessive friction (misalignment, contamination) | Re-match spring band to total load; reduce friction points; improve cleanliness and lubrication control where allowed |
| “Snap” upward and becomes uneven | Check if pull-down force feels high; observe rebound | Spring force band too high; over pre-tension; damper too weak | Reduce pre-tension turns; increase damping; reselect spring to keep force curve in target band |
| Batch-only uneven lift | Compare two lots; inspect spring strip thickness and coil geometry | Spring strip tolerance drift; coil spacing/concentricity drift; burrs | Set incoming inspection limits; add SPC on thickness/width; tighten coiling precision controls; improve deburring spec |
| Noise spike + uneven motion | Inspect contact marks on housing/tube; measure runout | Eccentric operation from poor coaxiality; coil rub | Measure coaxiality with dial indicator; correct assembly datum surfaces; tighten idler concentricity control |
5) OEM Prevention: Make Uneven Lift Hard to Manufacture
To reduce uneven lift at scale, treat the drive system like a platform—not a pile of parts. Practical prevention moves:
- Define “measurement-based acceptance”: coaxiality/runout, rise time window, pull-down force window, noise gate.
- Lock tolerance where it matters: spring strip thickness/width, coil spacing, concentricity, idler seating, bracket datum.
- Operator-proof pre-tension: use a marked fixture or controlled winding tool, not “feel.”
- Do change-control like a grown-up: fabric density changes, bottom rail redesigns, and tube diameter changes must trigger a spring band review.
FAQ
Q1: If only one side lifts higher, is it always a “cord length” issue?
Not in cordless spring-driven roller systems. Persistent one-side lift is more often axis misalignment or asymmetric friction at brackets/idlers/end plugs than a length issue.
Q2: What’s the fastest way to separate “installation” vs “mechanism” problems?
Re-mount the blind on a known-level test jig. If the tilt disappears, it’s installation geometry. If it stays, it’s internal drive alignment, spring band, or damping.
Q3: Why does uneven lift get worse over time?
Eccentric operation accelerates wear. Once one side starts rubbing, friction increases, which amplifies the imbalance. You get a feedback loop: small tilt → more friction → bigger tilt.
Q4: Can damping/brake tuning really change “tilt”?
Yes. A damper that releases too fast can create surging near the top, and surging magnifies any small left-right imbalance into visible tilt.
Q5: What should an OEM record for traceability?
At minimum: spring lot, damper/brake lot, bracket lot, assembly line ID, and the three measured outcomes (rise time, pull-down force, coaxiality/runout).
Q6: When should we redesign instead of “tuning”?
If your SKU mix spans large weight differences, or if you’re near the edge of a spring band, tuning becomes unstable. Consider a modular platform with clear load bands and standardized alignment datums.
Field Insight
Uneven lift is not a “mystery defect.” It’s a measurable imbalance. In most OEM cases, you win by enforcing alignment discipline (true coaxial drive axis), keeping the spring output inside a stable load band, and preventing tolerance drift from turning into eccentric friction. If you want fewer returns, make the product impossible to assemble “almost right.”